
Building The Ultimate Keyboard Utility Rig: A Free Guide
As I’ve continued to grow as a keyboard player, the list of keyboard/monitoring problems have grown from a small list to a long spreadsheet. As I planned this keyboard pedalboard, these are the problems I was trying to fix. It needed to:
• Be small/light enough to fit in my carryon laptop bag for fly dates. That includes room for in ear monitors, pedals, etc as well
• Have built-in power for a computer and multiple keyboards and FX pedals to reduce ground loops and hums, and simplify power outlet needs
• Have a built-in direct monitoring with a “more me” option (with independent volume and panning) for merging/mixing FOH and my keyboard
• Have enough inputs to run at least 3 stereo keyboards or FX pedals live, allowing me maximum flexibility to scale up or down depending on the needs of the gig
• Have the ability to send multiple outs so I can send two different stereo outputs of keyboards to FOH, while still monitoring what I’m playing
• Work with or without a computer attached
• Have built in EQ and compression for taming crappy monitor mixes quickly. For festivals and quick showcases, this is an absolute must to survive a bad in ear mix.
• Be quick enough to setup and tear down in less than 30 seconds, including all cabling
• Have the ability to mute my outputs to FOH so I could build patches without them hearing it
• Have charging for my phone or iPad, and connect them to a computer when necessary
• Have enough USB connections to attach extra midi controllers in the future
• Have quality high-gain balanced outputs so I wouldn’t have to use venue DI boxes
• Be just big enough to safely fit a laptop on top of the unit
• Be rock solid in build quality with as few things as possible to wire up onstage.
This list seemed next to impossible, and I went through 5 iterations before I finally built one I was super happy with. The final keyboard rig, to my surprise, checked every item on the list.
Dimensions/Weight:
Size: 11” by 13” by 3.5”
Weight (with cabling): 9.4 lbs
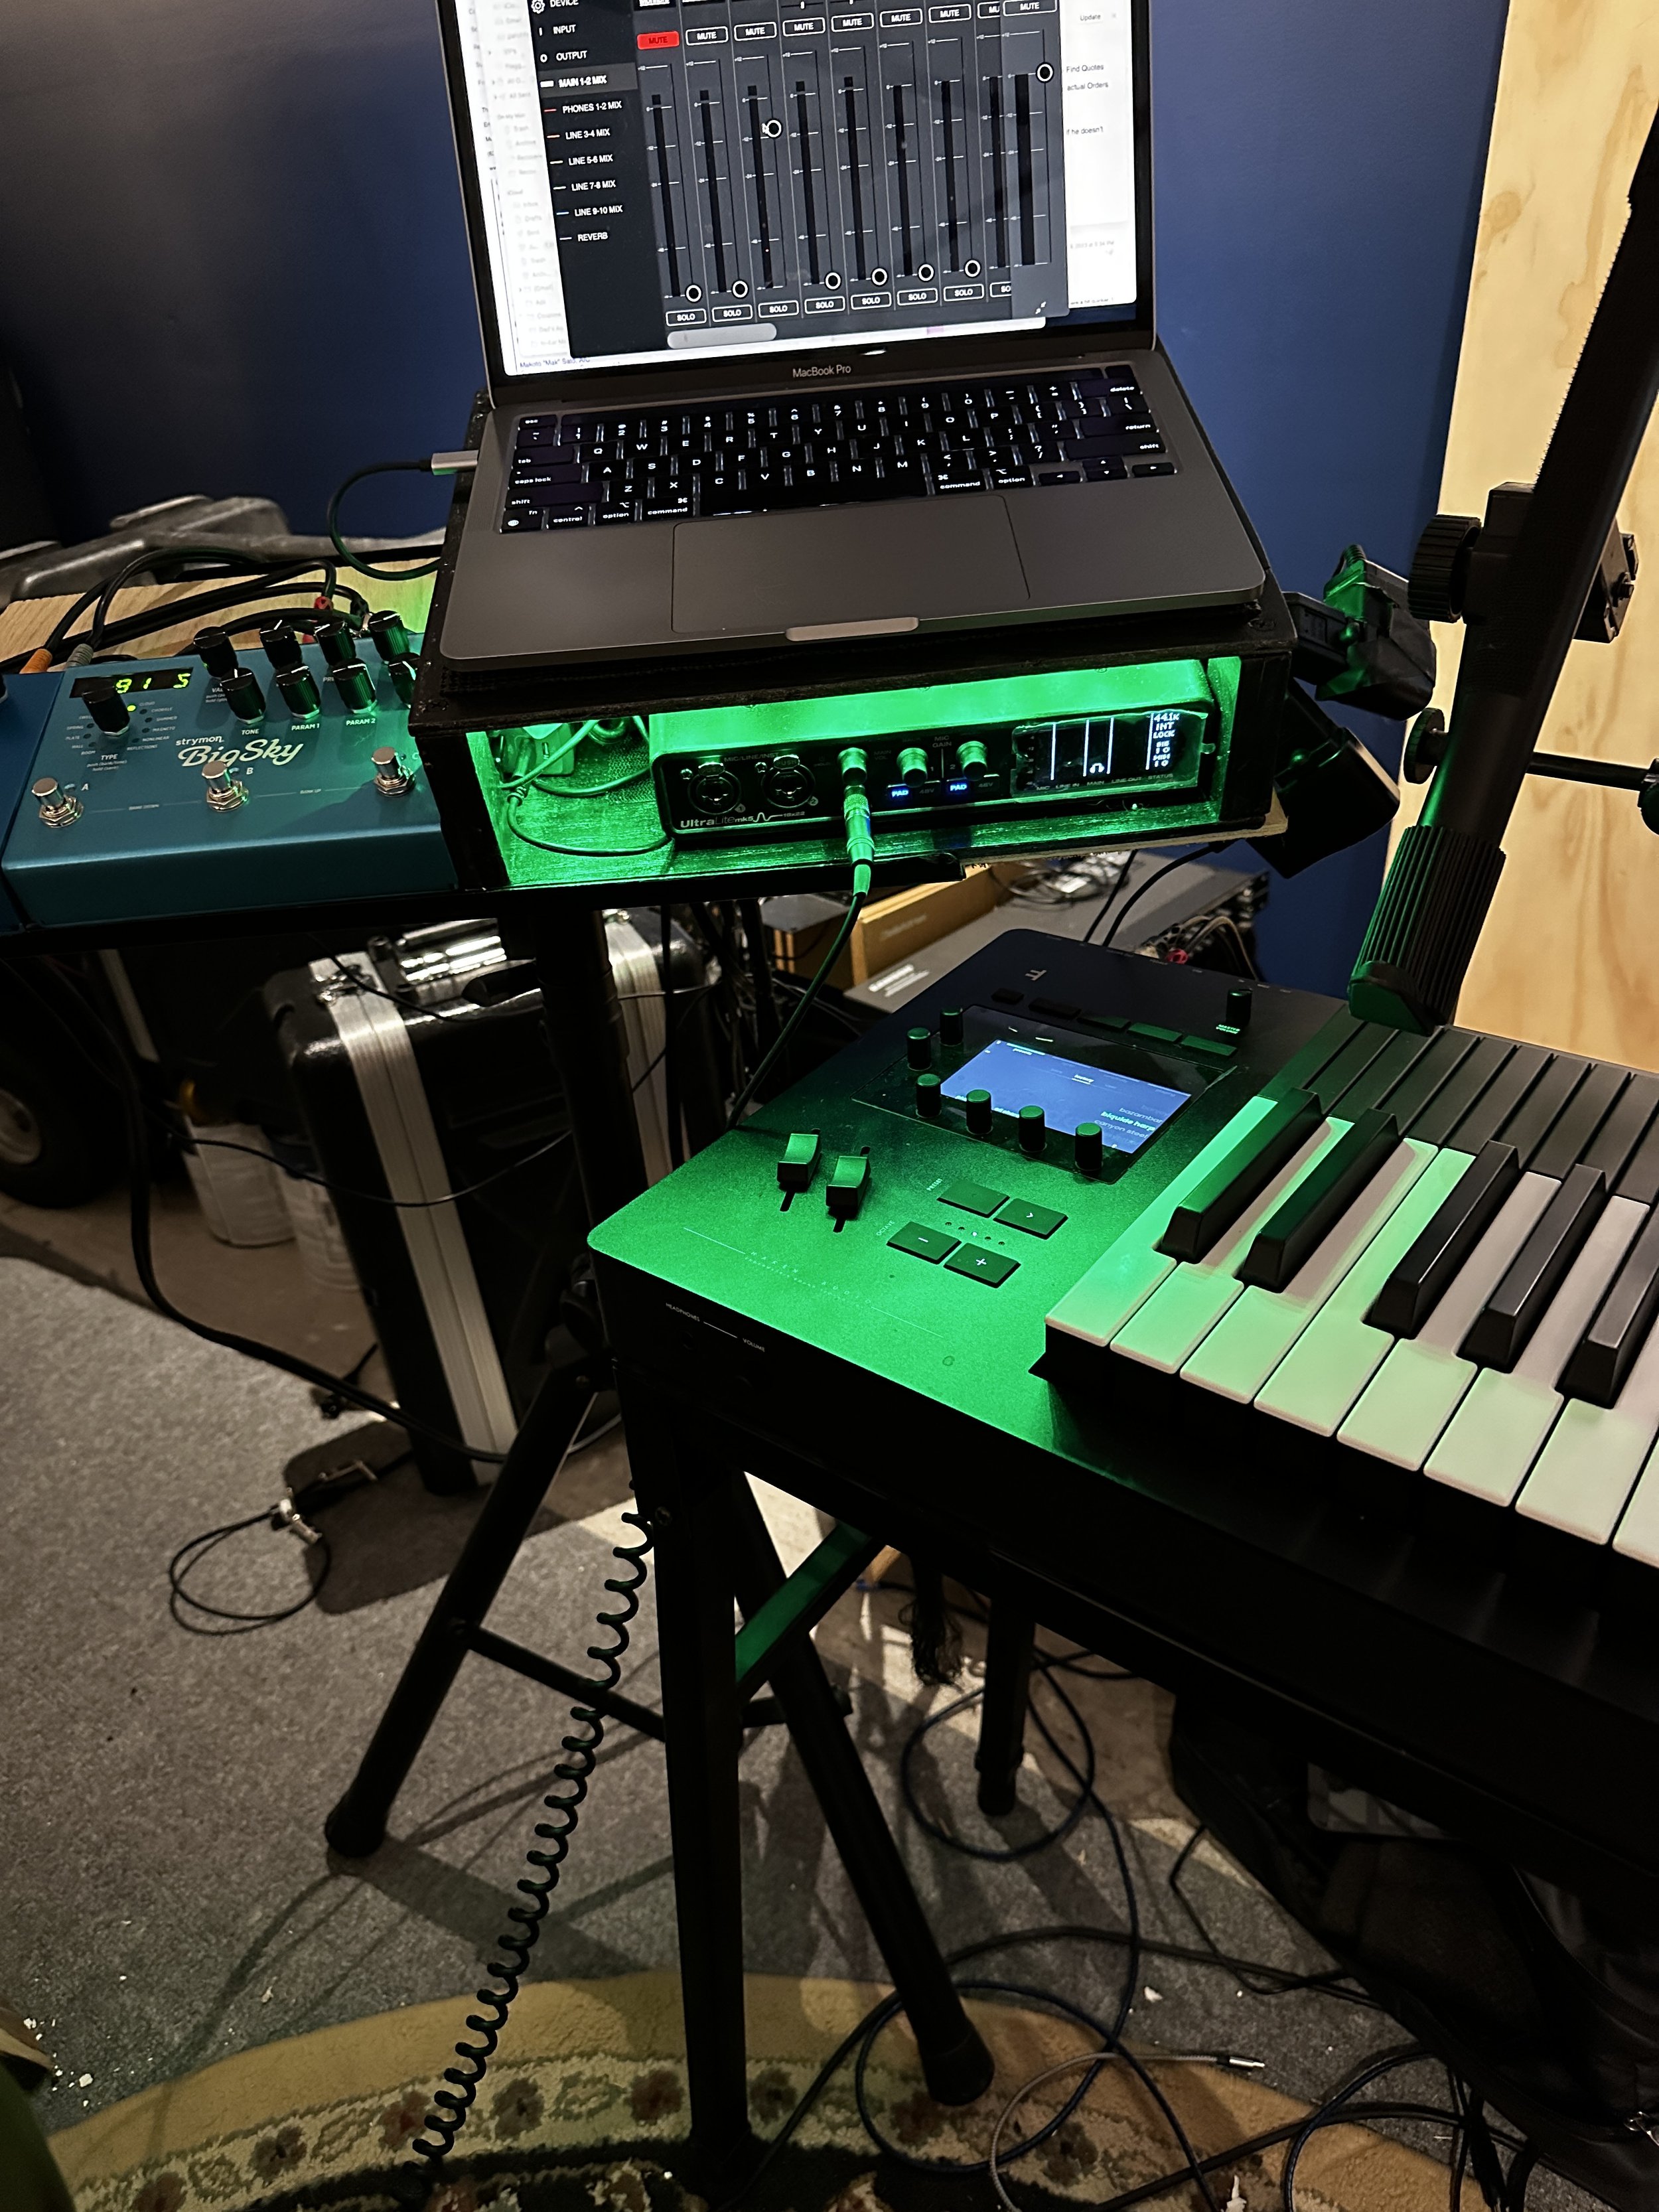
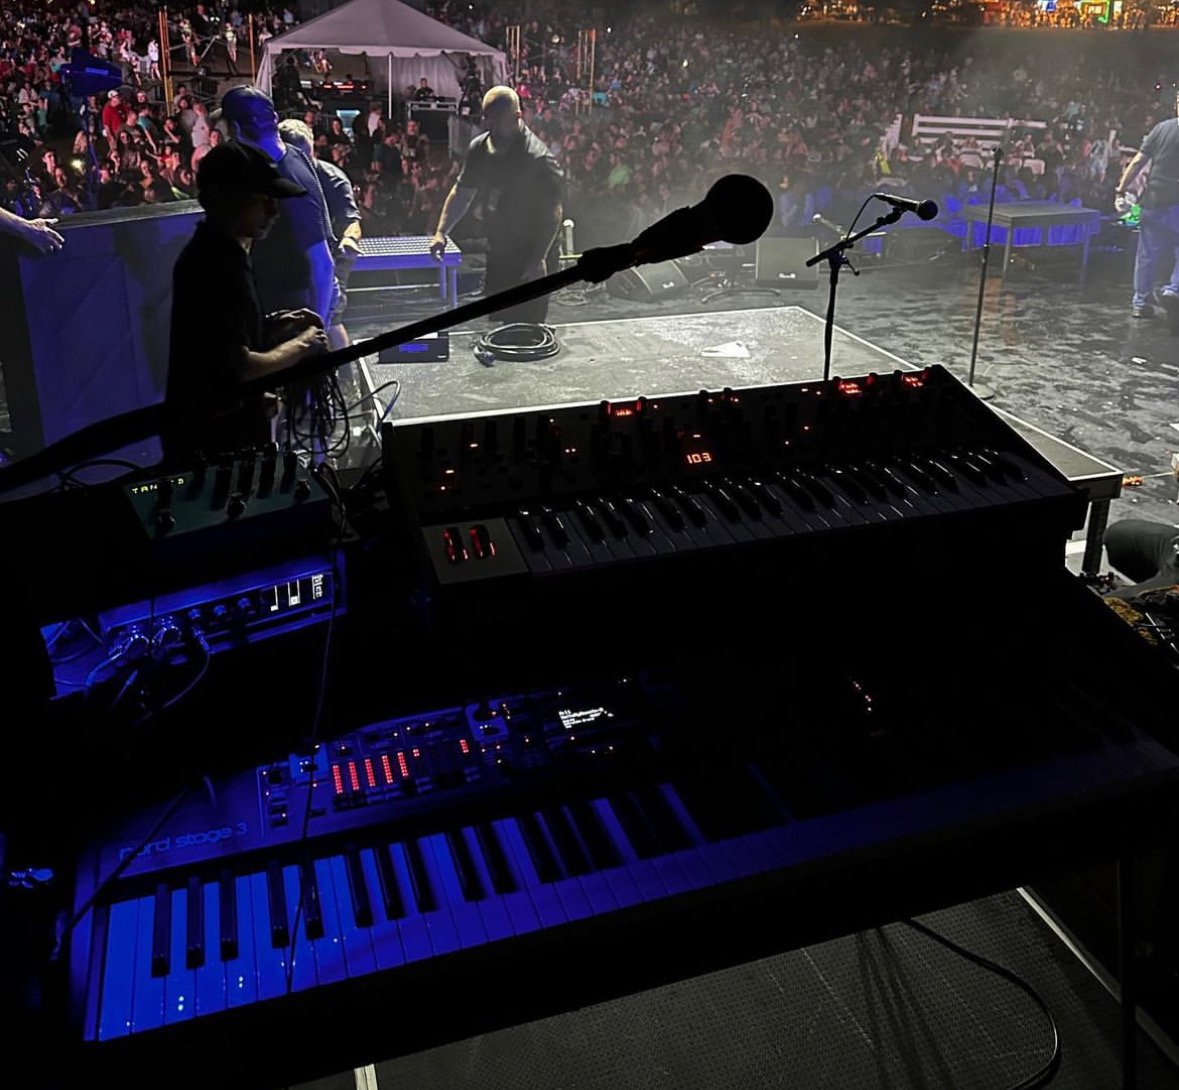
Before I break it all down, here’s the pictures:
In a recording studio:
Onstage at a festival:
From the front:

The back (with all cabling in for two keyboards and an FX pedal)

The sides:


The Gear
The gear I picked for this one had to be:
Exceptionally rugged
Lightweight
Stable
For the first time in my career, I didn’t care how much each item cost. I just needed something that worked, not necessarily that was inexpensive. Here’s what made the rig:
Some plywood that I got from Lowe’s to build a case to exactly fit the dimensions of my laptop bag (I got enough to do two sheets with dimensions of 11” x 13” by 3.5”, plus a short piece of wood that I cut into 4 posts for the corners)
All items I picked for the reviews, but the Ultralite MK5 was the only piece of gear I did extensive research on. Here’s why I picked it:
It’s the only 8 input/10 output small format audio interface on the market that offers onboard mixing and FX, without needing to be attached to a computer. This is super helpful to me, since I often don’t use a computer live and even when I do, if the computer crashes it’s still essential for me to have audio coming through. I use my audio interface as a sub mixer and almost always use some hardware keyboards live, and the Ultralite ensures I’m always sending something to FOH and able to hear myself at the least.
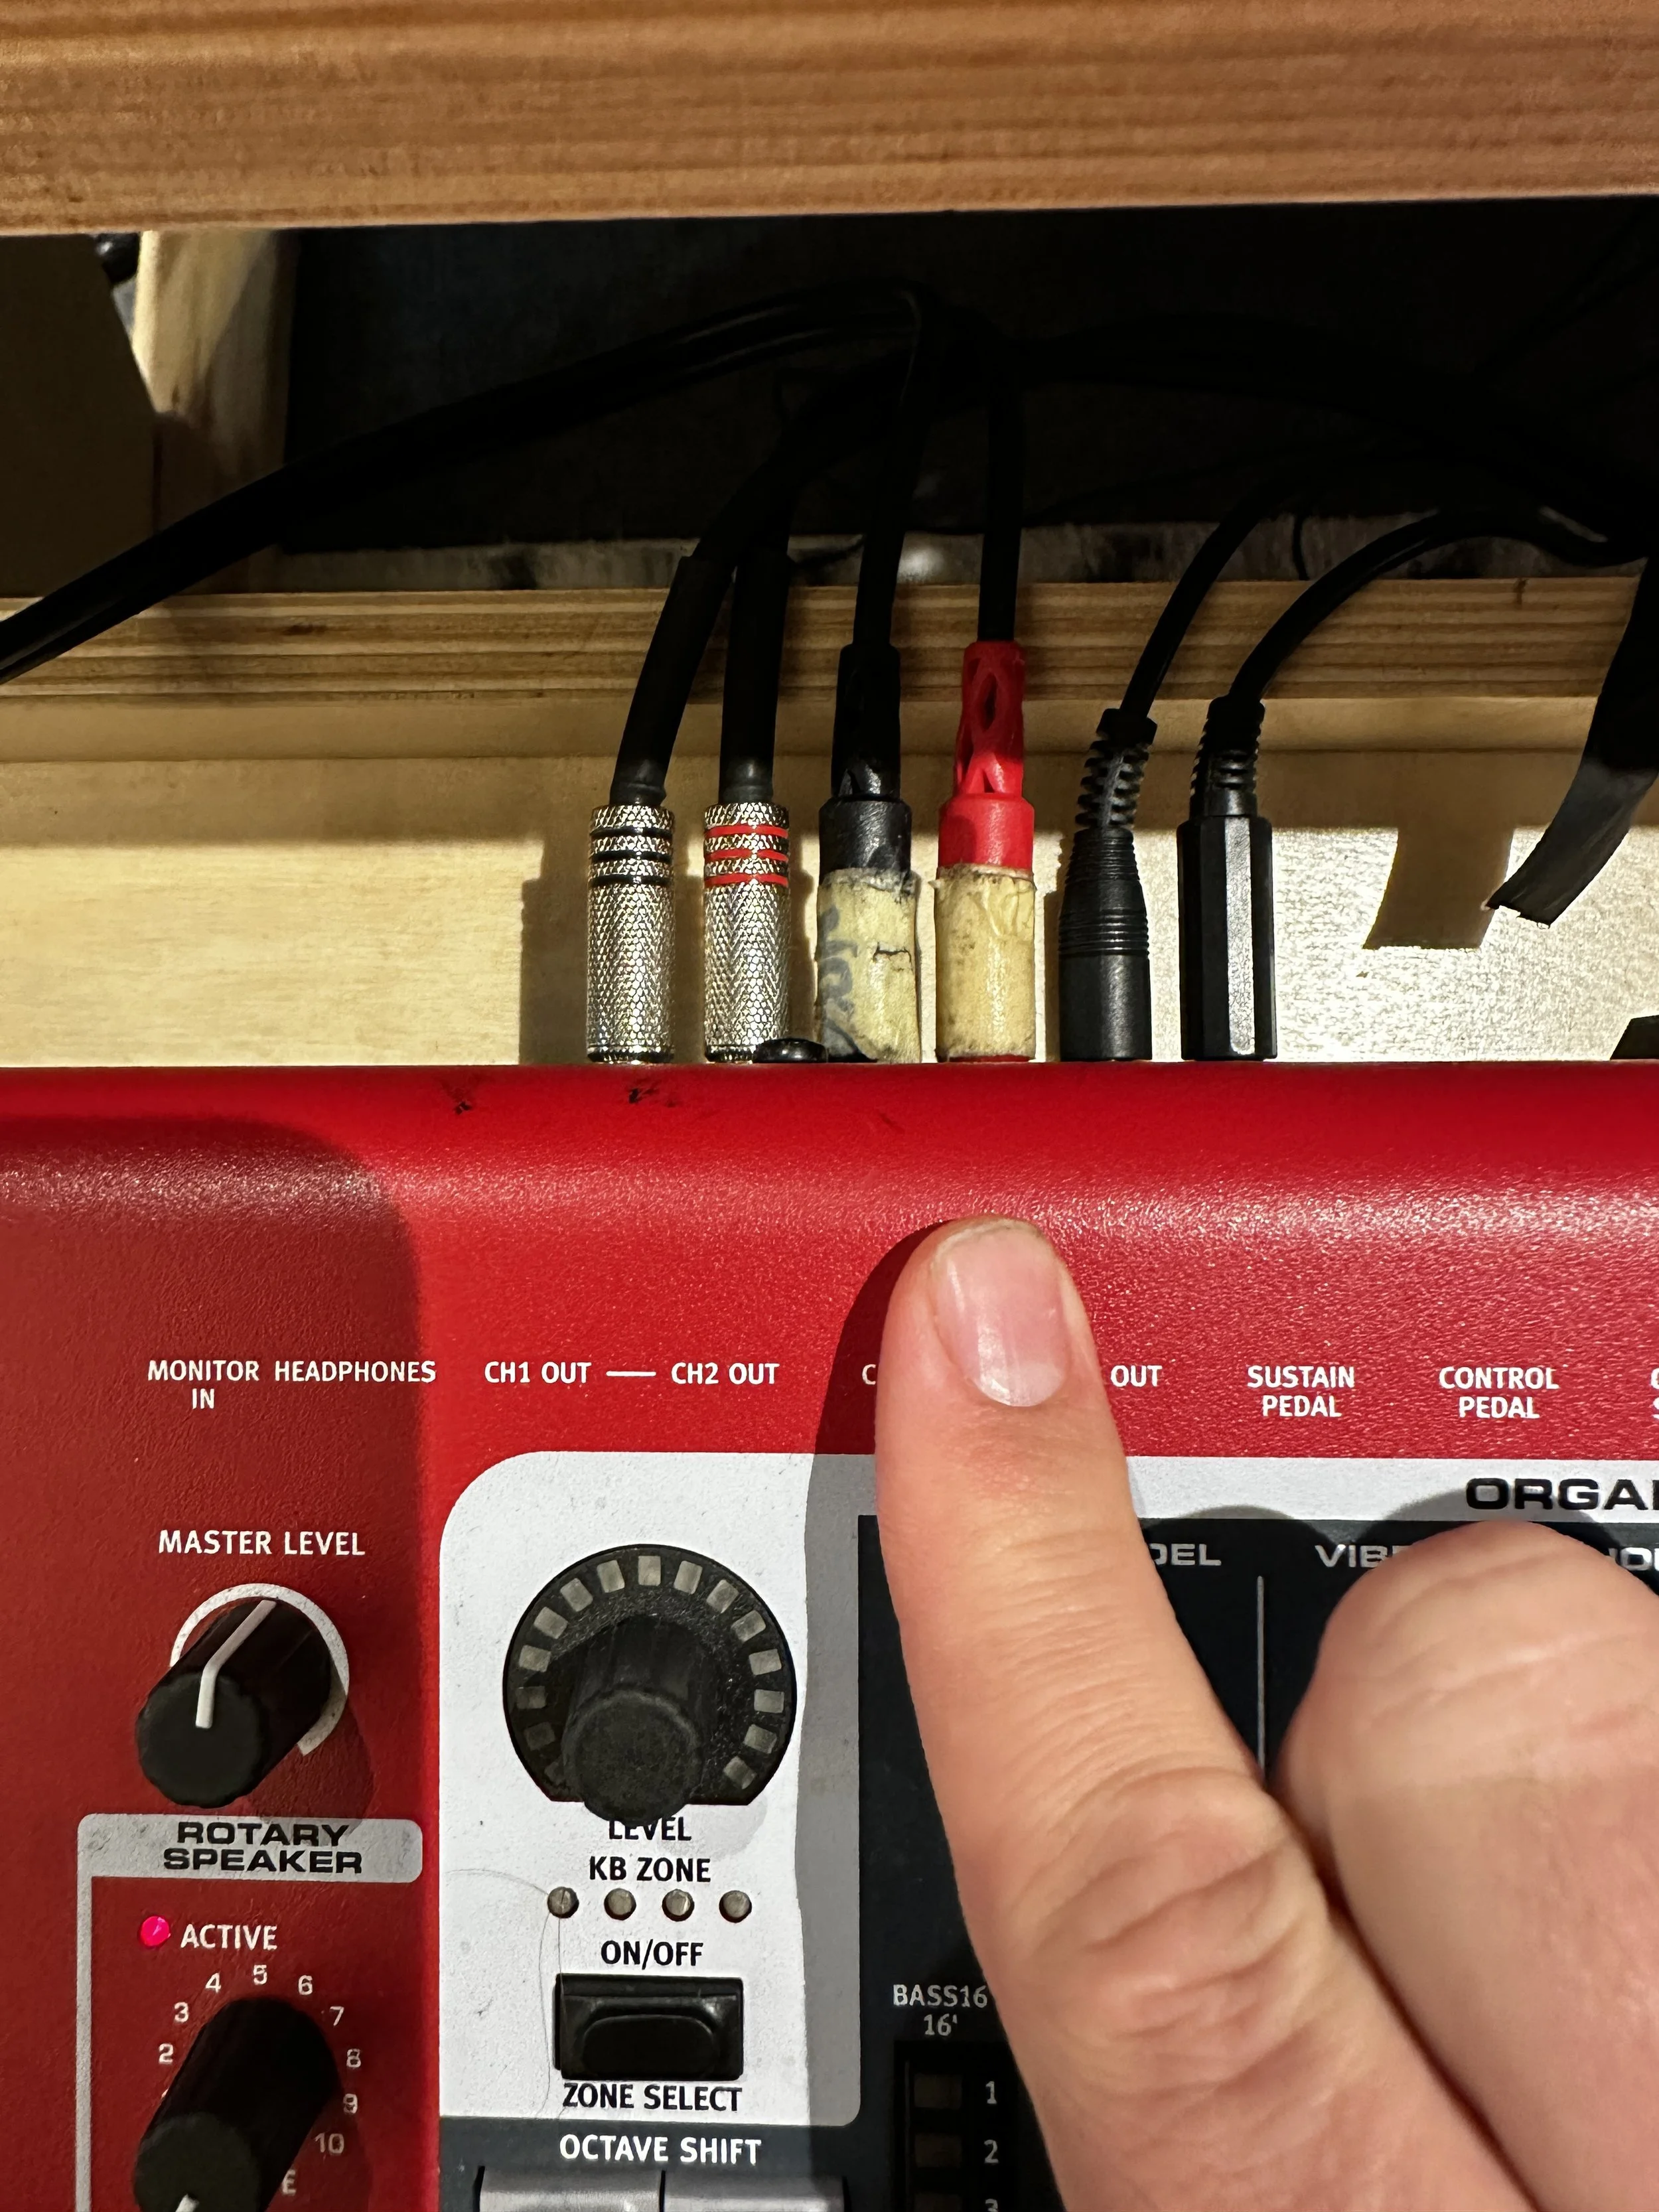
The Ultralite has balanced outputs, allowing me to use a pair of TRS to XLR outputs to send a clean balanced signal to FOH without needing to add a heavy DI box to my rig.
It has basic but very sturdy standard midi in/out jacks, which I’m not using at the moment but like to have on hand
The Ultralite’s 5 stereo outputs and separate headphone outputs give me the ability to do some crazy stuff that no other small format interface offers. I usually only use two stereo outputs, sending one stereo output to my Big Sky Reverb pedal (more on routing later) and my main stereo output to FOH, but it would be possible in the future to run stereo keys output, FX loop or second keys output, and still have 6 mono or 3 stereo outputs to send backing tracks from a computer, all while monitoring everything using a custom mix from the independent headphone out. No other small format mixer or audio interface has that level of power on the market right now.
The 4 stereo inputs give me enough room to connect what I need, and both the neutrik jacks in the front and the line inputs on the back are surprisingly clean, definitely far better than any other mobile audio interface I’ve used in the past. Right now I use the front two inputs for monitoring, plugging a stereo to dual TS cable into the front jacks and using the gain controls to alter the stereo field (more on this later). The other 3 stereo inputs are taken up by my Nord Stage 3, a second keyboard that varies depending on the gig (usually either a Sequential OB-6 or Roland Juno-X) and an FX return that I have connected to a small pedalboard.
With ADAT inputs, it’s possible to add an ADAT converter to add even more inputs, meaning you could theoretically rock up to 7 keyboards + an fx pedalboard if you wanted a massive rig.
Pictured: my Big Sky Reverb as a FX send, resting on top of the keyboard mixer

The thing that surprised me the most was not only does the Ultralite have all these features, but they’re actually FAR higher quality than I ever expected at this price point (yes, it’s a relatively high price point as small format audio interfaces go, but it’s not THAT much more than other rivals).
I’ve yet to run into any ground hum or buzzing, all the inputs and outputs sound super clean, and the unit itself has been rock solid after several months of demanding show environments. A lot of the time manufacturers slap a bunch of features in a unit but cheap out on the build quality, but this unit is the exception to that trend.
Hardware Build
I started by placing all of gear on the piece of wood, and positioning them as tightly as possible, taking into account power and trying to have the minimal number of wires touching each other. After experimenting with several positions, I came up with this positioning:

I then cut the wood in the shape I needed (making sure it also fit the dimensions of my laptop bag) and then painted all the individual pieces with a gun metal black paint.
Once it was all dried, I attached the 4 wooden pieces to the bottom and began assembling.
I started by plugging in the Ultralite to the power strip, and adding cabling as I went while wearing headphones to check for noise. Surprisingly I was able to get all the cabling to work together without any interference the first time, which was a combination of luck, good high quality cabling, and the build quality of the usb hub and Ultralite.
Routing
The Ultralite MK5 has a great computer based mixer (it claims that it can connect via their iOS app, but I haven’t been able to get it to work). Each output has this mixer page in the CueMix App:

It’s possible to set level, pan, EQ, compression, and even reverb send for each channel in each stereo output. For a basic setup, I’m focused on the Phones output mixer and the Main 1-2 Mixer.
Setting Your Monitor Mix
Starting with the headphone mix, I brought the level up for both my Nord Stage 3 (coming in on line inputs 3-4), making sure it didn’t clip. I was really impressed with the headroom in the Ultralite- it accommodated a lot of gain variation without any problems with driving or clipping.
I then brought up the levels on inputs 1-2 for my in ear monitoring mix and made some adjustments. I started by stereo linking them, so I could apply the same effects to both at the same time.
I can easily monitor the output with the LED meters on the front of the unit

Then I added some safeguards. I turned on the compressor, and dropped the threshold to “tighten” up my general mix a bit (make the quieter parts louder, louder parts softer) and give me a little protection in case of a sudden audio spike. I usually like to run my in ear monitor input at around -5 DB, so I set the threshold to compress anything over that amount.

I left my Nord Stage 3 gain as is, but I could add reverb, EQ, or compression as well if needed. I went ahead at this stage and brought up the computer outputs for future use.

Setting Up the Main Outputs
Now that my in ear mix was dialed in, I clicked on the Main Output tab. I started by muting inputs 1-2 (that I’m using for monitors) and putting the faders at zero. This keeps my monitor mix from feeding back into my keys channel, which could create some crazy feedback.
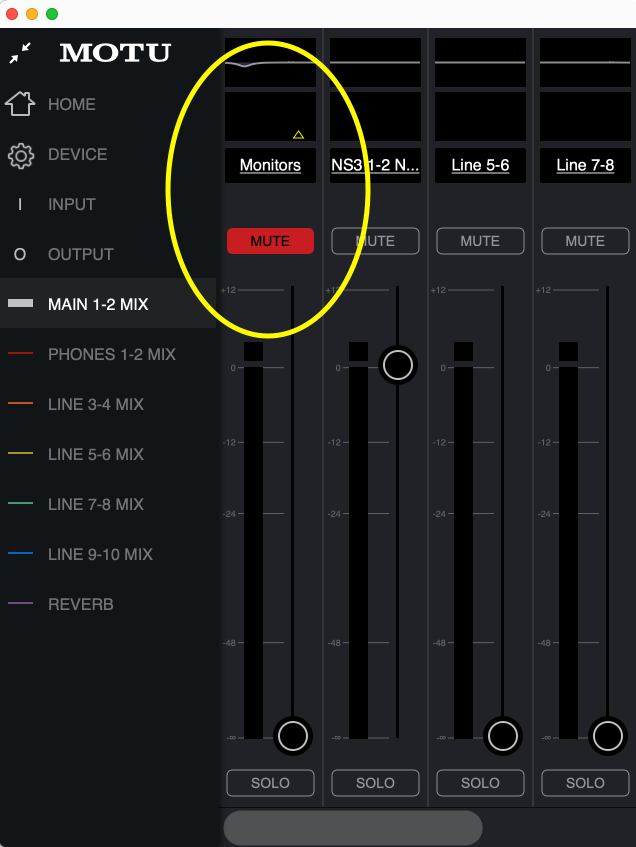
Then I brought up the inputs 3-4 and computer audio, matching it to what I had the levels set in my headphone mix so I didn’t clip at the output stage and not be able to tell.

Last, I used the front knob to adjust the main output gain. I could toggle between my main output control and headphone output control by clicking on the knob in the front.

I sent the audio out of the outputs in the back via TRS to XLR cable, and the gain range was huge and the output was loud and clean. That’s a big win!
I’m using multiple outputs in this pic, but the main 1-2 outputs are what always send my main keyboard mix to FOH.

An important feature for a keyboard player is the ability to mute your outputs to FOH so you can dial in sounds without disturbing others, and it’s always best if you can still hear what’s going on in your monitor mix when doing that. To do this, I just have my computer attached (or hopefully I’ll have the iOS app in the future running on an iPad) and I mute the master output on the Main Mix tab. This just mutes my main outputs, and lets me keep dialing in sounds while keeping tabs on everything.

How To Add More Keyboards/FX
The problems I’ve faced in the past with keyboard utility rigs are that I’m always swapping around gear, and expandability is always challenging. The advantage of this system is there’s a LOT of room for growth. Here’s 3 setups I can scale up to if needed:
Example 1: Adding an FX pedal + dual stereo keys outputs
Effects pedals can breathe life into keyboards, but it’s tricky to set up usually. On top of that, mix engineers will often want two separate stereo outputs, one for synths and one for meat and potatoes keyboard parts. Here’s how I’d set that up:
If I’m just using the Nord Stage 3, I’d go into the routing and set just the synth section to come out of outputs 3-4.

2. Then I’d connect another cable from outputs 3-4 on my Nord Stage 3 keyboard to inputs 5-6 on the Ultralite. This will let me set a separate output channel for the Nord Stage 3 that I can send to the Big Sky Reverb pedal.
3. Then I’d connect a pedal to outputs 5-6 of the Ultralite and into the Big Sky Reverb.

4. I’d then connect the outputs of the Big Sky Reverb to the inputs 7-8 of the Ultralite. (see above picture)
5. Then I’d open up CueMix, click on the headphones tab, and make sure inputs 5-6 are muted. This will keep me from hearing the "dry” audio from my Nord Stage 3’s separate output.

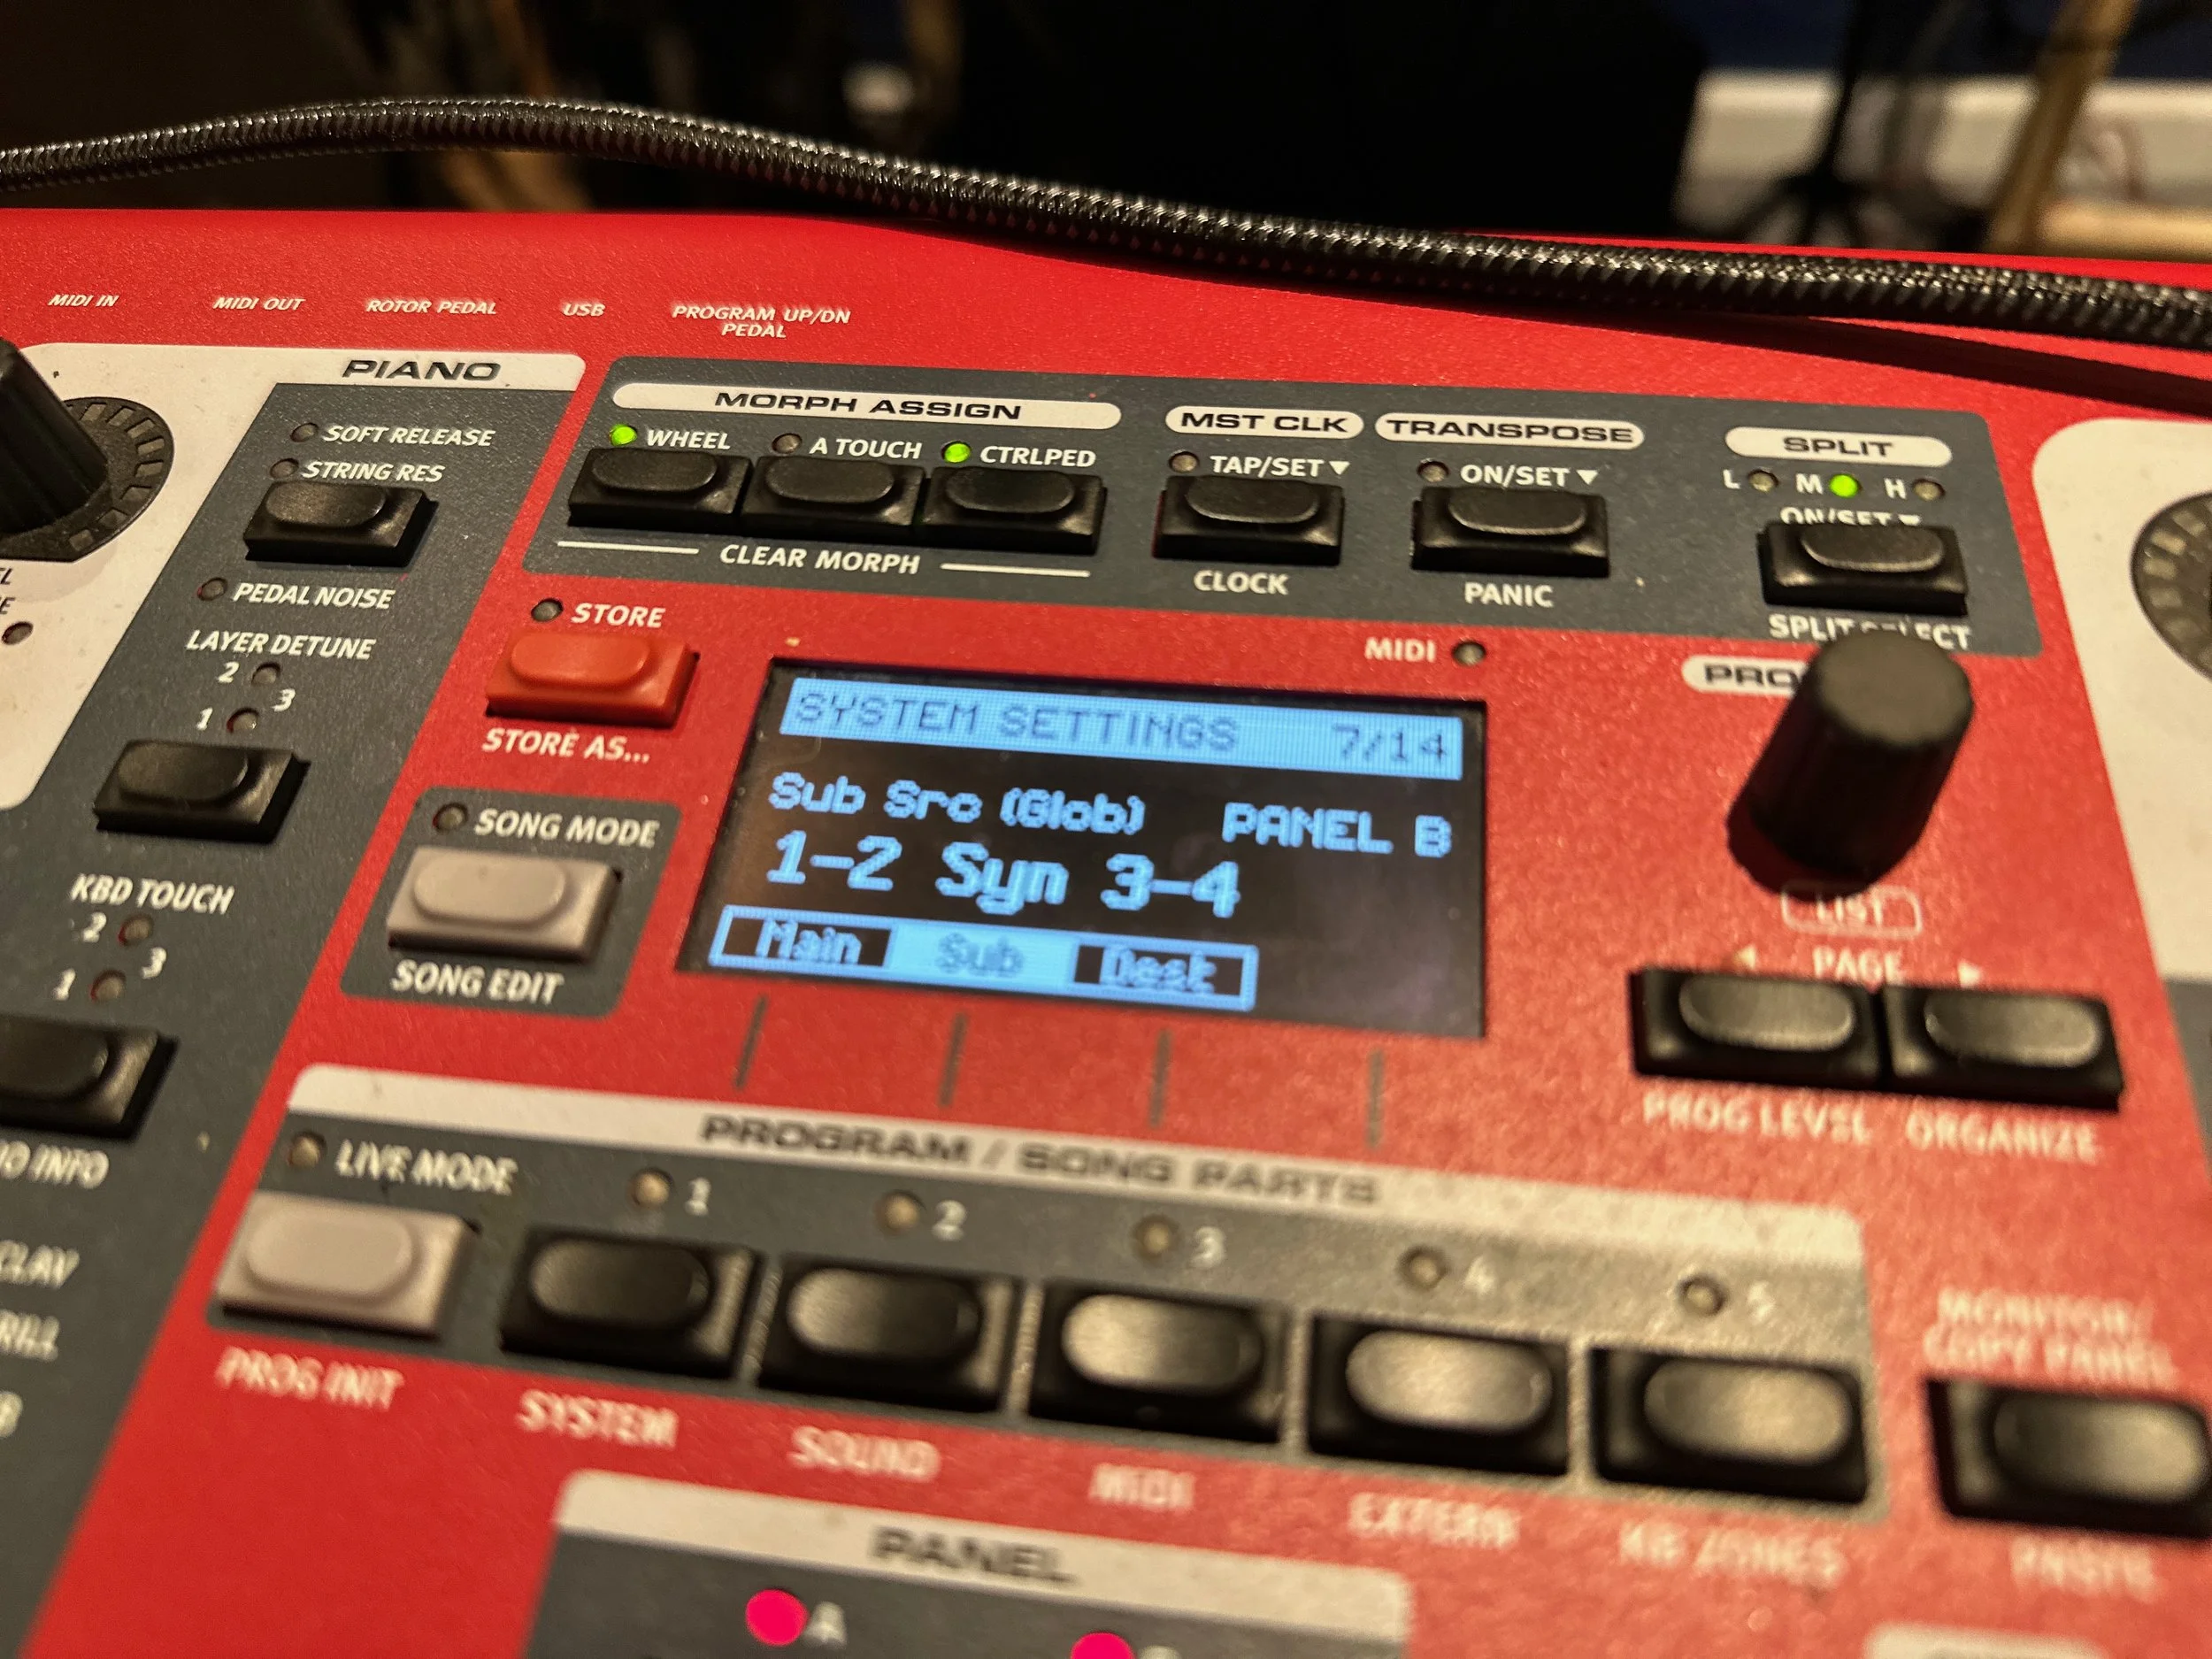
6. Next, I went into my Nord Stage 3 (skip this if you’re using an extra keyboard), and held shift and pressed the “system” button. Then page through until you reach the Sub Src setting, which allows you to select which element of the Nord you send to the 3-4 outputs. I like to use the synth section on panel B, but you can choose what you like.
6. I’d then click on the outputs 5-6 tab, make sure all the channels are muted, and then unmute and bring up inputs 5-6. That would send the audio of my Nord’s synth to the Big Sky Reverb.

7. Then I’d simply adjust the level of inputs 7-8 on the phones output for monitoring.

8. To finish, I’d click on the outputs 3-4, and turn up channels 7-8. This will only send the “wet” keyboard signal out of outputs 3-4, and leave the rest of the stuff going through outputs 1-2.

Example 2: Sending/Monitoring Backing Tracks
Often times keyboard players are asked to run tracks live, and with so many outputs on the Ultralite MK5, it’s possible to not only monitor your keyboard and monitors, but also monitor and send up to 8 mono backing track outputs (or 4 stereo) to FOH. Here’s how to do it:
Go to the 3-4 outputs, and put the Computer 3-4 outputs up to 0 DB. Make sure that all other faders are muted or at zero.

2. Repeat with all of the the other outputs, bringing up 5-6 software outputs for 5-6 outputs, etc
3. Go to your software, and assign the outputs in your DAW (we’re using Ableton Live here) to outputs 3-4, 5-6, etc.

Once you’ve done this, if you want to directly monitor in real time what your DAW is sending, you can click on the “Phones” tab and bring your outputs up to 0 DB for all of the software outputs you’re using.

Areas to Improve
This rig is amazing, but there are a few small things I’d love to have. The Ultralite MK5 doesn’t currently have the ability to have Scenes like a traditional digital mixer does, which means you set it is how you set it, and it takes some mousing around to change it.
I’d love to see them add the ability to seamlessly switch scenes manually or with a program change message, since this would make things a lot more flexible in live situations. I also wasn’t able to get the iOS CueMix app to work on my iPad, which was a disappointment. I used a combination of cables to try and figure it out, and it just never worked. Adding reliable iOS software would be very helpful.
Conclusions
Everyone’s needs are different, but if you’re looking for something powerful, flexible, and small enough to fit in a backpack, this will solve many of your issues.